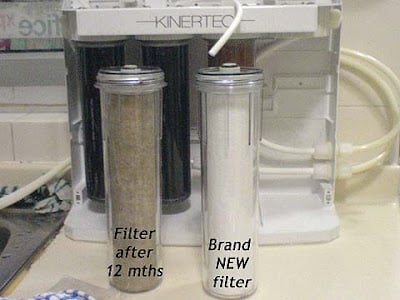
Regular maintenance of your whole house water filter system is essential for ensuring clean, healthy water throughout your home. One of the most important maintenance tasks is changing the filter cartridges or filter media regularly. This guide provides you with step-by-step instructions on how to change filter cartridges in a whole-house water filter, along with tips for optimal system performance.
Why Regular Filter Replacement Is Important
Changing your filter cartridges is crucial for maintaining the effectiveness of your water filtration system. When filters become clogged with sediment, dirt, and contaminants, they lose their ability to purify water effectively, which can lead to:
- Reduced Water Quality: Over time, dirty filters allow impurities to pass through, compromising the safety of your water.
- Decreased Water Flow: Clogged filters can reduce water pressure, leading to slow water flow throughout your home.
- Increased Wear on the System: A dirty filter forces the system to work harder, potentially reducing its lifespan.
Preparing for Filter Replacement
Before starting the filter replacement process, gather the necessary tools and follow these steps:
- Shut Off Your Water: Locate the main water valve and turn off the water supply. If your whole house water filter has its own shut-off valve, you can use that instead.
- Relieve Water Pressure: Open all the faucets in your home to release any built-up pressure in the system and drain water from the pipes. If your system has an outlet valve, make sure to close it before proceeding.
Step-by-Step Guide to Changing the Filter Cartridges
Once you’ve prepared your system, follow these steps to replace the filter cartridges:
1. Activate the Pressure Release Button
- Press the Pressure Release Button on the Filter Housing: This will release any remaining pressure in the system, making it easier to unscrew the filter housing without damaging the components.
2. Unscrew the Filter Canister
- Use a Filter Wrench to Unscrew the First Canister: Place an empty bucket under the filter system to catch any residual water that may escape.
- Carefully Remove the Canister from the Housing: Tilt the canister to drain any remaining water.
3. Remove the Old Filter Cartridge
- Take Out the Old Filter Cartridge: If the filter is stuck, gently tap the canister to loosen it. Be careful to hold the o-ring in place to prevent it from falling out.
- Set Aside the Old Filter for Proper Disposal: Follow local guidelines for disposing of used filter cartridges.
4. Clean the Filter Canister
- Clean the Inside of the Canister with Warm, Soapy Water: This will help remove any sediment or debris. Rinse thoroughly with clean water.
- Dry the Inside of the Canister with a Paper Towel or Cloth: Ensure there is no moisture left before reinstalling the new filter.
5. Inspect and Lubricate the O-Rings
- Check the O-Rings for Damage: If you notice any cracks or signs of wear, replace them with new o-rings.
- Lubricate the O-Rings with Silicone Grease: This helps create a proper seal and prevents leaks. Place the o-rings back in their original positions.
6. Install the New Filter Cartridge
- Insert the New Filter Cartridge into the Clean Canister: Make sure it is positioned correctly within the canister.
- Hand-Tighten the Canister Back onto the Filter Housing: Avoid over-tightening, as this can damage the threads and compromise the seal.
7. Check for Leaks
- Slowly Turn on the Water Supply and Inspect the Filter Housing: Look for any signs of leaks around the housing.
- Tighten the Connections or Add Plumber’s Tape if Necessary: If you notice leaks, turn off the water and make adjustments as needed.
8. Repeat the Process for All Filters
If your whole house water filter system has multiple stages (e.g., sediment and carbon filters), repeat these steps for each filter that requires replacement.
Final Steps to Complete the Filter Replacement
After replacing all the filters, follow these final steps to complete the process:
- Fully Turn On the Water Supply: Allow water to flow through the system to flush the new filters according to the instructions in the user manual.
- Open Several Faucets in Your Home: This will help release any trapped air and flush out loose carbon particles from the new filters.
- Monitor Water Pressure and Flow: Once the water pressure returns to normal, close all faucets.
How Often Should You Change the Filter Cartridges?
The frequency of filter changes depends on the type of filter and your home’s water quality:
- Sediment Filters: Replace every 6-12 months.
- Carbon Filters: Typically need replacement every 12 months, but may require more frequent changes if your water contains a high level of chlorine or other contaminants.
- Specialty Filters (e.g., Iron or Fluoride Filters): Follow the manufacturer’s guidelines for replacement intervals.
Consequences of Not Changing Your Filters Regularly
Failing to change the filter cartridges can lead to various issues:
- Compromised Water Quality: Dirty filters allow contaminants to pass through, which can be harmful to your health.
- Reduced System Efficiency: A clogged filter can strain the system, leading to higher energy costs and shorter system lifespan.
- Potential for System Damage: Overworked filters can cause leaks or damage to the filtration system itself.
Schedule Professional Maintenance for Your Water Filtration System
For peace of mind, consider scheduling routine maintenance with a licensed professional. My Georgia Plumber offers expert water filtration system services, including filter replacement and system inspection, to ensure your home’s water remains clean and safe.


